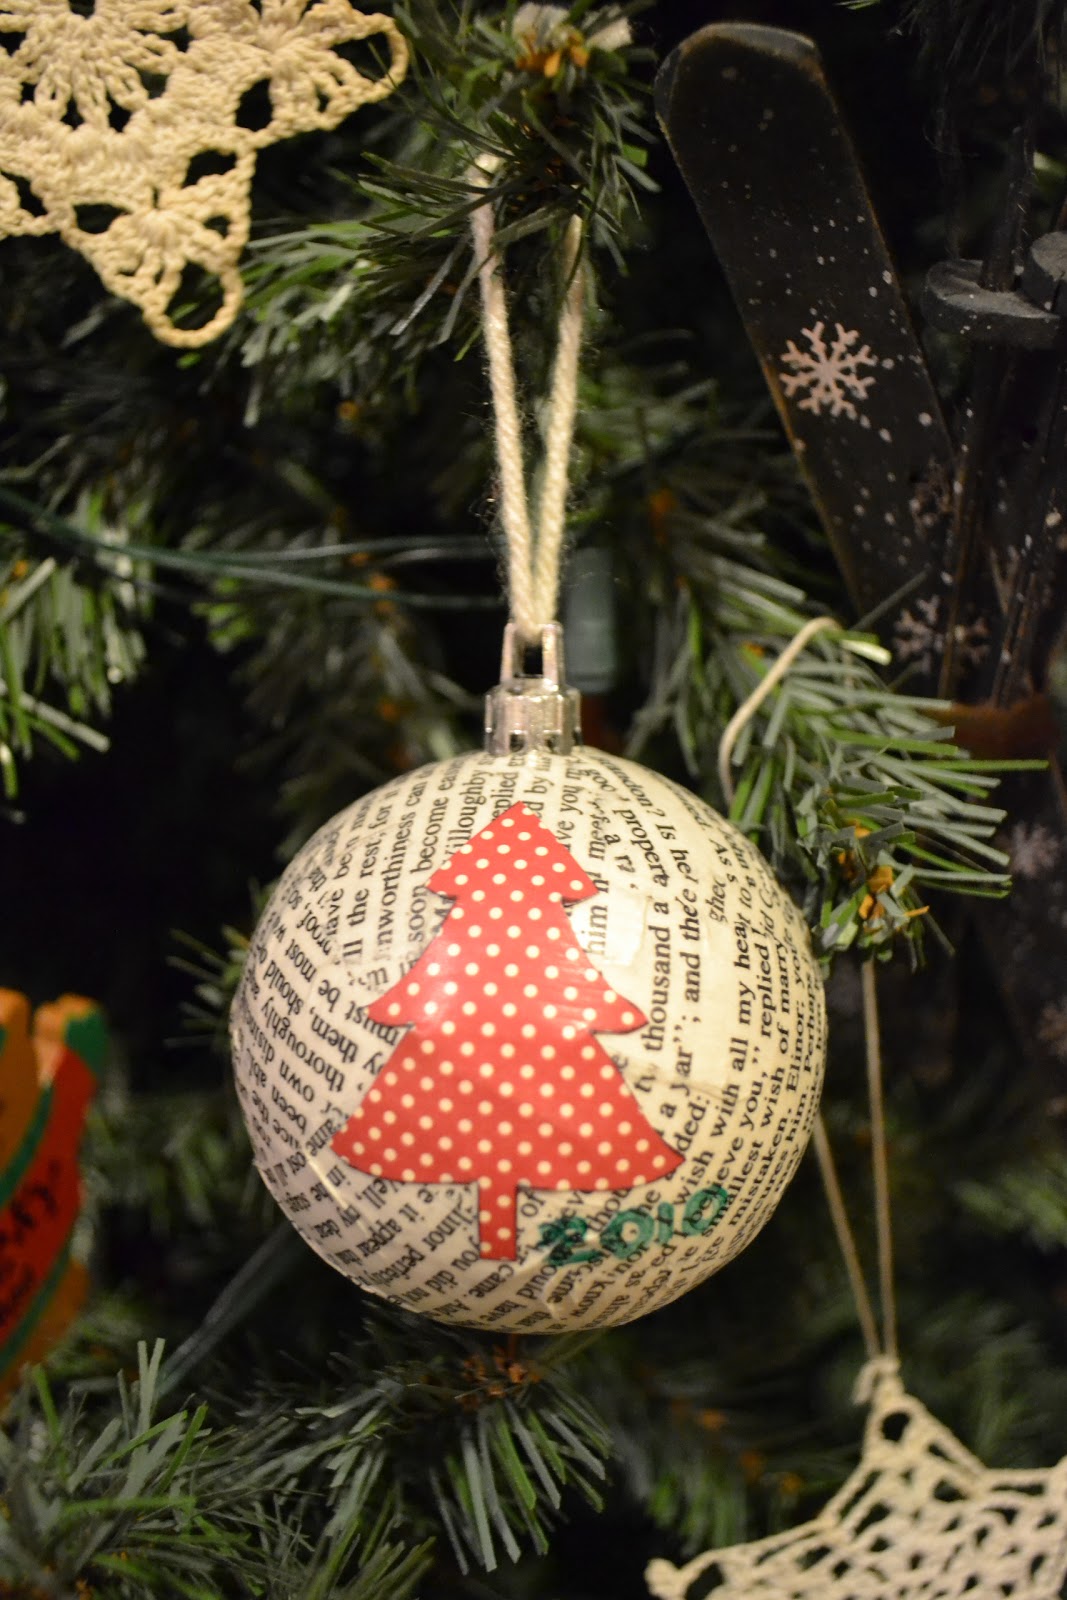
Decoupage ornaments diy Craft fairs, Ornaments diy, Crafts
25 Easy Paper Christmas Ornaments You Can Make at Home MagMent
Smooth the small napkin square over the decoupage glue, then lay a small piece of plastic wrap over the napkin. Smooth out any bubbles. Remove the plastic wrap and let the decoupage glue dry completely. Use sandpaper to gently remove the excess napkin paper, smoothing the edges of the wood round.

Personalised Custom Christmas Wrapping Paper Gift Wrap
Add mod podge. Cover the ornament with a layer of mod podge. I like to use foam brushes. They are cheap and work great! Step 4. Attach image. Place the image onto the ornament and press lightly to adhere. A super helpful tip for decoupage is to use plastic wrap to secure the image and remove any wrinkles. Step 5.
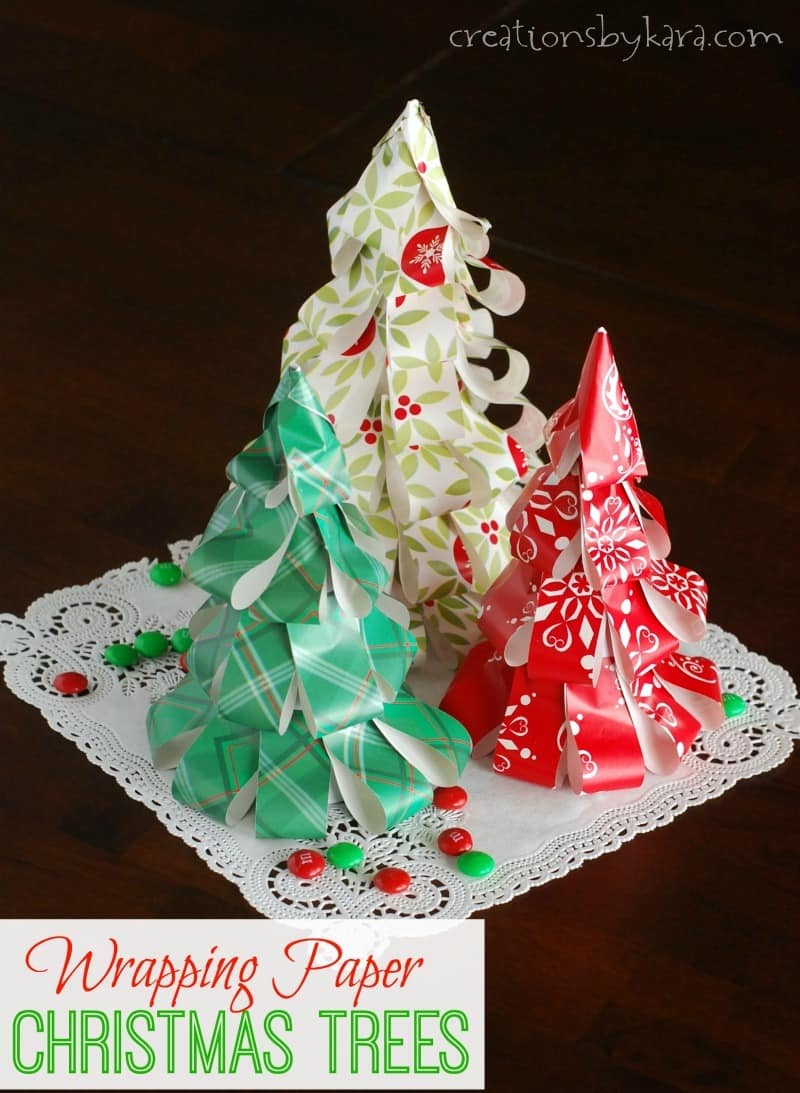
How to make wrapping paper Christmas trees
How to Make these DIY Ornaments: Apply a thin layer of glue in small sections on the ornament. Attach the fabric squares or your small pieces of paper. Repeat process until the ornament is covered. Allow the decoupage glue to dry completely. Apply a second thin layer of Mod Podge and allow to dry overnight.

DIY Ornaments Made From Wrapping Paper Scraps All Things G&D
Add Paper Strips to Ornament. Cut the strips into a few shorter sections. This will make wrapping them randomly around the ornament easier. Cut a few very short to fit around the top of the ornament. Hold ornament by the hook or use a clip to hold it while you work on it. Starting at the top, brush decoupage medium on ornament.

Dancin' with Happiness....Custom Wrapping Paper Floral wrapping paper
Gently apply the paper pieces in your desired design to the ornament using your fingers. For best results, make sure the paper lays flat by dabbing it again with a foam brush. Wait 10 minutes for.

DIY Ornaments Made From Wrapping Paper Scraps All Things G&D
as an Amazon Associate and DecoArt influencer I may earn a commissionSuccessful Decoupage Every Time Ebook https://amzn.to/3ngHhPKFree Kindle App for your sm.

Decoupage ornaments diy Craft fairs, Ornaments diy, Crafts
This decoupage ornament craft is super easy to make with kids and a great way to use up leftover fabric scraps - something we always have plenty of now that my daughter has developed a love for sewing.. A quick and easy method for making decoupaged Christmas ornaments using leftover fabric scraps or scraps of wrapping paper. A unique way.

3 DIY Craft Projects to make with Wrapping Paper in 2021 Paper crafts
#UPCYCLE #DIY #DECOUPAGESome of my most iconic pieces are decoupage so in this tutorial i share with you all my hints, tips and methods of mastering decoupag.

Decoupage ornaments, why didn't we think of this?! Christmas crafts
White Wrapping Paper: For a white background, use white wrapping paper, or white scrapbook paper with Mod Podge on decoupage ornaments.. Tip: When using a 2-ply paper napkin for decoupage ornaments, carefully separate the layers of the napkin. Tip: Work with small pieces of paper in a small area at a time..

Easy Paper Scrap DIY Christmas Ornaments Mod Podge Rocks
Place a wooden Christmas tree ornament on the wrong side of the tissue or wrapping paper. Trace with a pencil. Cut out the tissue paper (or wrapping paper) tree. Pour out some mod podge onto a paper plate. Using a sponge paintbrush or roller, cover one side of the tree evenly with the mod podge.

Last Minute Christmas Crafts Vintage christmas wrapping paper, Diy
Add classic elegance to your Christmas tree or holiday vignettes with an easy, inexpensive and Elegant DIY Christmas ornament using Mod Podge, paper napkins and craft ribbon. I am excited to once again be joining a talented group of blogging friends for a monthly Pinterest Challenge hosted by my sweet friend, Cindy of County Road 407.

How to Make Decoupage Ornaments with Wood Rounds and Napkins The
How to make Decoupage Christmas Ornaments. Supplies List. Step 1: Cut fabric into 1.5″ strips. Step 2: Glue on fabric strips. Step 3: Cut and glue almond-shaped pieces. Step 4: Paint caps and tie ribbon (optional) Decoupage Ornament FAQ. Like this post? Check out more holiday ideas and inspiration:

paper napkin decoupage on large ball ornament with glitter! Holiday
STEP 6: CAREFULLY LAY WRAPPING PAPER DOWN ONTO SURFACE. This is probably the trickiest step. Start at one end and get your corners placed first, and then slowly lay the paper down a little at a time. across the top, smoothing it out with your hand to make sure there are no air bubbles (a brayer works well too).
How to Make Homemade Christmas Ornaments Taste of Home
Instructions. Cut your fabric into manageable bits using the scissors. Add Mod Podge to the paper mache ornament - place a piece of fabric down and then brush over it to smooth it down. Repeat, continuing to add Mod Podge and place more fabric squares. As you cover one side of the ball, let it dry.

Christmas wrapping paper. Love the retro designs. We used to buy our
Let the decoupage medium dry. If you are using pictures on thicker paper, such as photos or greeting cards, they can take longer to dry. Watch for bubbles as your pictures dry. If one forms, use a pin or utility knife to pop it and then use your fingers to smooth it down. The Spruce / Rita Shehan.

Pin by Garry Taylor on Vintage Christmas Wrapping paper Vintage
The following decoupage crafts for the home transform ordinary into extraordinary. These decoupage ideas include using paper, napkins, fabric scraps, and delicate pressed flowers, which are then applied to household objects. Take a look at these super fun ideas and get inspired to make your own.
